The question
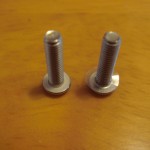
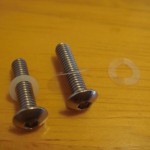
Earlier we introduced two types of bolts: the serrated head bottom and the square headed bolt (M3, 6mm length). What screw – serrated, square headed, with or without hexagon socket – should be the default MakerBeam screw?
 The regular bolts worked for the old, non-anodised, beams that had surprisingly high friction. The new, anodised, beams have a harder and more smoother surface. A surface that provides less friction and occassionally left a round head spinning. We wanted to eradicate this problem. Especially since there always was the suspicion about makerbeam that tightening would be a issue.
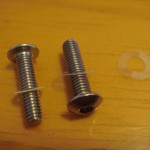
 Clearly we needed to find bolts that provided better grip. The square headed bolts were the best option we thought. Unfortunately enough the production time was unclear. The serrated head bottom then was introduced as a temporary alternative. When the square headed screws came in – surprisingly fast – we decided to make these the default MakerBeam screws. Not everyone was pleased by that decision and we started to have our doubts. We needed more input and a test was put in place.
The jurors
Joel Bodenmann, MakerBeam fame: –3D printer (and reseller B-Electronics);
Sean Reynolds , MakerBeam fame: cSpring – the biped-robotic educational development kit that has a makerbeam frame (and founder of Cognitive Spring);
Anders Roxenhag, MakerBeam fame: a live plotter and a polar plotter we love;
Tinhead, MakerBeam fame: – The Stinger – a PCB milling machine (and Let’s Make Robots contributor).
The test results
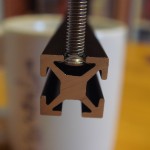
Grip: Compared to the regular bolt the square headed and the serrated provide more grip. Especially the square headed bolt. Sean explains why: “The square heads provide more surface area that actually grips. The pinching area is essentially two triangular shapes rather than two small pinching partial circles.”
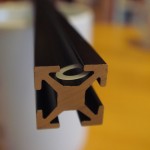
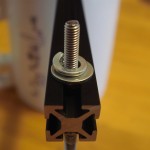
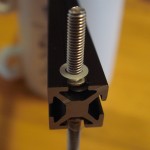
Fit: The square head bolt fits the makerbeam profile better than a round headed bolt.
Tightening: As you tighten the square headed bolts the bolt spins slightly inside the beam till the corner of the bolt hits the interior of the beam thus making two triangular contact areas. The square headed bolts tighten down stronger since they do not turn in the beam. As Tinhead expressed: “they work better as they do not turn once on the beam as with the normal round ones”. Round heads, serrated or not, definitely have a disadvantage here. Therefore Anders sees no real purpose for the serrated head bottom screw in comparison to the square headed bolts. Joel is a big fan of the serrated screw. “You can get the same amount of tightness witht the serrated bolts as witht the square headed ones.” His issue with the square headed bolts comes when overtightening them.
Overtightening: Joel had overtightened the square headed screws and had problems removing them. Removing the square headed bolts could not be done without a tool. This damaged the thread of the screw rendering the screw useless.
Tinhead does not encounter this problem. He suspected that tightened hard the square headed bolts would lock against the beams. “This is not as bad as it sounds though, because two light taps on the beam with the screw driver get’s them loose again.”
Sean even thinks tightening the square headed bolts hard deforms the beams less than it did with the round heads. Since the contact area is larger.
Sliding: Most jurors mentioned the fact that sliding the square headed bolts into the beam is a bit harder. When making a construction the jurors prepare brackets. Anders: “I prepare the bracket with four bolts and attach the nuts with a few turns. Then I slide them into the beam.” The square headed bolts need to be aligned a bit before you can slide them in. This takes more work than before. Anders describes this best. “It [the necessary alignment of each bolt] does not happen every time and it is not a huge problem and if I had known nothing else, I would accepeted it as part of the workflow.”
For Joel it is another factor in favouring the round headed serrated screws. They slide in easier.
Sean completely accepted the new ‘workflow’. He was sceptic because of the ‘sliding’-issue. But now only uses the square headed bolts. The other screws need fiddling to get in. “They were so large that they barely fit in past the ends of the beam.” According to him these two amounts of effort – fiddling vs. aligning – are roughtly equal amounts of work. Sean has become a fan of the square headed bolt.
Backwards compatibility: We like looking forward and this is why we had these bolts tested. But there is the issue of backwards compatibility. The square headed bolts work well with old makerbeams (v1.0) and the new beams. (v2.0). Here is a link to link to our blog post ‘Version 2.0’. The serrated did not fit very well with the old beams.
The result
Sean favours the square headed bolts. Working with his old beams Anders still likes the regular screws. With the new beams he prefers the square headed bolts. He sees no purpose for the serrated screws. Only the hexagon socket is head is “awesome”. Joel favours the serrated head bottom screws very much and absolutely dislikes the square headed bolts. Tinhead sums it up like this: “I would say between the three choices the square headed ones get the best of the other two, easy to slip in, easy to tighten, easy to get them out.”
The decision
The suspicion about MakerBeam that tightening would be a problem looms large. We realised this again upon discussing the results. Eradication of this suspicion is our main concern we realised. We feel the square headed bolts tackle this issue best. They provide a better grip and fit than other bolts. The square headed bolt will become the default MakerBeam bolt. Plus, we are looking into adding a hexagon socket on the head. The serrated head bottom screws will gradually disappear from our stock.
Team MakerBeam.eu