New blog and Facebook

We changed to a new webshop. The blog featured on our website will have all the latest news. This blog will be updated with customer projects and other news items.

For all the updates please visit our website and look under ‘Blog & News‘ or check our Facebook account. You can also find us on Twitter @makerbeam.

Looking forward to keep you updated and communicate with you through these channels.

Team MakerBeam

p.s. This blog was edited on August 12th, 2016. We expected we could no longer make use of it after we stopped using our old website. No updates were posted. Since it is still circulating we reconsidered and started updating again.

Circular Knitic

Circular Knitic is a completely open source and open design circular knitting machine that is produced by using digital fabrication tools, and thus, allows to be replicated by everyone, who has access to a 3d printing and laser cutting. By using digital fabrication and makers’ tools, like 3D printing, laser cutting, MakerBeam, and Arduino, we have designed an automated and replicable circular knitting machine.

TinkerForge cameraslider

cameraslider
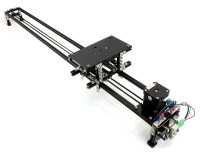
You can move video and photo-cameras on a slider to make attractive recordings. Moving time-lapse recordings with a DSLR or arbitrary video-camera movements are the main applications of the kit. The kit can also be used for completely different purposes where linear motion is needed (see end of the video below).

Bewaren

Bewaren

Bewaren

Selfmade custom lengths

CR80_1Max made this project with selfmade custom lengths. The beams were 200mm and then cut to 185mm.

Max his tools: clamps and a hack saw.

Yates_speed_clamp_6saw_cr


Hi,
So I ordered another lot from chartup.com and when this lot arrived they were the new version where the centre holes goes all the way through. Excellent! I cut them to length using clamps and a hacksaw in my kitchen. Then tapped the threads using an M3 tap, a power drill and some bicycle chain oil. It all worked perfectly so it is possible without proper tools 🙂
Thanks,
Max”

If you want to know more about Max his project please visit the fanlesstech website: http://www.fanlesstech.com/2015/01/nofan-cr-80eh-build.html

Thank you Max!

Team MakerBeam.eu

Distorted OpenBeam discovery

Unfortunately we discovered some 1000mm OpenBeam that have distorted ends. The tips were squeezed together as if they were handled by strong pliers on that end. Leaving the tips twisted and the holes oval instead of round.

We quickly inspected some packs and indeed found other beams that were distorted this way. This inspection also gave us the insight that it was a production failure rather than us packing the beams the wrong way. There were packs with distorted and non-distorted beams wrapped together. These tips should have been cut off in the production process.

Upon a closer inspection we have come to the conclusion that the distortion appears almost exclusively in the longer lengths OpenBeam. This means the beams of 600mm, 750mm, 1000mm and 2000mm.

Last week we sent an email out to the OpenBeam customers who possibly have bought affected beams from this batch. This way we can work out some form of compensation for  these customers or simply replace the affected beams with good beams.

We are very sorry for this to happen. Naturally we are in contact with out manufacturer as to make sure this does not happen again.

Team MakerBeam

PCB and component holder project

We would like to share with you a work-in-progress, but still an inspiring project: creating a PCB and component holder, which is designed to make soldering easier.

The project is running in the hands of Mark Swinhoe, and he shared with us a little background about it.

“This little tool was inspired by how expensive professional PCB holders are, and how they immediately reminded me of MakerBeam. The holder allows you to angle the component, and use the mounting holes to keep it in place.


The vertical beams can be easily loosened for different width of components and the PCB standoffs slide up-and-down the vertical beams for height adjustments. If you need more space from the vertical bars, then you can add another set of standoffs on top of the existing ones, or just attach longer standoffs. The components are held really well with MakerBeam, and it has a very solid base.” – (by Mark Swinhoe)


Mark, thanks for sharing it with us. We wish you more fun with it and a successful result. We hope, that we can see your robot running-around soon.

Team MakerBeam

Prototyping a Dynamic Wifi Antenna Rig

Wandy is designing an antenna rig with the capability to track its wifi AP via GPS and motion sensing. This rig is designed to be installed on maritime vessels in order to provide a high quality wifi link to shore based access points. The built-in GPS receiver will give the rig its current position and heading and calculates its angle towards the shore based AP.
The shore based AP locations are hard-coded into the rigs software, and compared with the rigs current sector in order to allow several different AP’s to be registered according to location. This current model has not got the gimbal system installed yet. This will counter wave movement of the ship by motion sensing and keep the antenna levelled with the AP.

This prototype was built using Makerbeam. Makerbeam gave us the flexibility to quickly change the design in order to develop new features. The first housing, was 10 x 10 cm and turned out to be too small to fit the embedded router-board. Changing the dimensions was as simple as changing your socks, and in no time we had a larger base.
One of the things that makes Makerbeam so well suited for this project is its aesthetic properties.The black anodised beams have a beautiful finished look to them. With a couple of black polystyrene sheets and a Stanley knife, the prototype looks the part in a matter of minutes.

The threaded beams enabled us to use the corner cubes and this gives the prototype a real design look. Makerbeam enabled us to make a prototype we can actually show to potential customers without having to make too many excuses.

In the video you will see the device waiting for a GPS lock and doing a calibration by the flick of a switch. Note the awesome design lights on the bottom of the rig.

httpv://youtu.be/PTKTet0h9oo

Ammer van Bussel
Netwerk engineer
Wandy